Parallax Phone Wallpaper using CSP

100% complete
Intro
With the new CAD station opening soon, I wanted to have some materials for a 2-3 hour workshop that would introduce beginners to digital art tools and techniques. When brainstorming, I kept thinking about other in-person workshops where you get to walk away with some physical at the end and so I figured a phone background could be a fun digital equivalent. Taking it a step further and making it a parallax background seemed like just the extra flavor this project needed to take it to the next level!
What is a Parallax Background?
A parallax background is a background that creates a 3D illusion by moving different layers of an image as you tilt your phone around. A notable example is the old iOS 7 wallpaper that was bokeh or soft bubbles/sparkles.
Tools
- Clip Studio Paint
- "3D Wallpaper" app (or similar parallax wallpaper app on your smartphone)
Set Up
Creating a Template
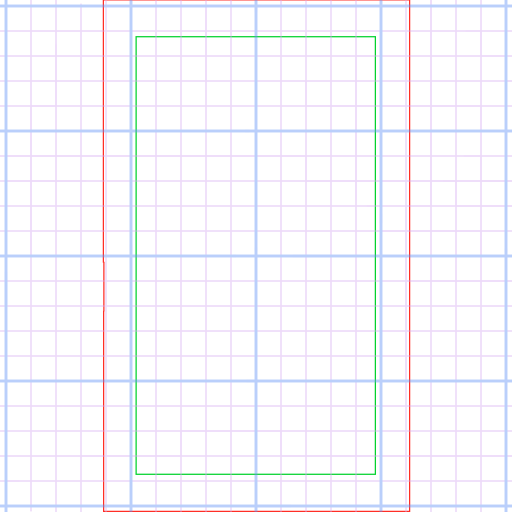
A parallax wallpaper needs to have a significant amount of bleed (extra space around the main area of your phone screen) to create the scrolling 3D illusion, so I needed to create a template to make sure key elements of our illustration will land in the middle of the screen.
I know the app uses 2048px square images. So I used CSP's grid tool and snap function to whip up a grid of 100px squares to use as a reference. I set the start point of the grid to "center" and drew purple lines every 100 pixels. I marked the center line and every 500 pixels with blue lines so I could judge the sizes even faster.
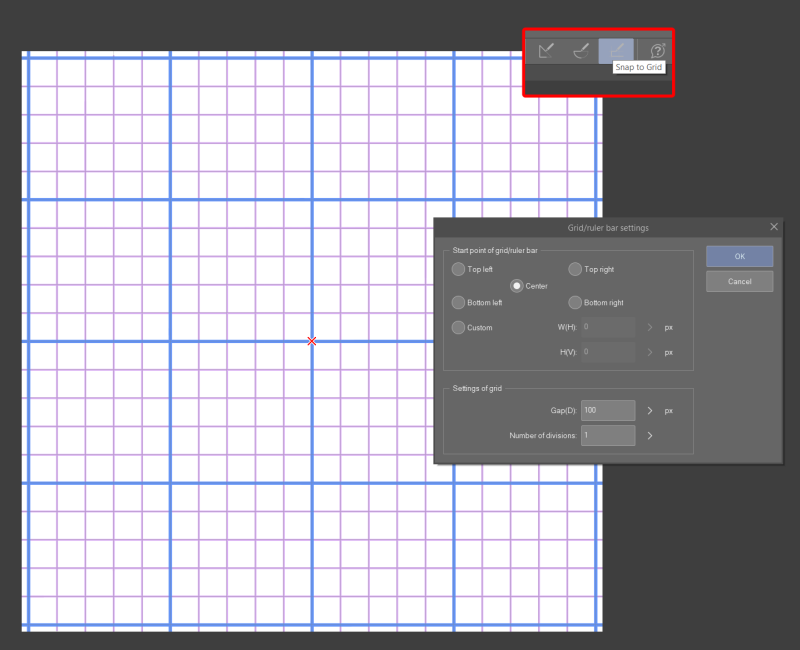
Then I uploaded the grid to the 3D Wallpaper app and took note of the range of the parallax effect. Of course I'll have to keep in mind that phones have different aspect ratios, but this gives me a good idea of a baseline range.
Illustrating - the fun part!
Thumbnail
I wasn't too pleased with my first few attempts at making an interesting background. For the class I want to balance something easy to draw with something that looks compelling. But ultimately I enjoy drawing character art the most, so I spoiled myself and went ahead with what I would want to create for myself.
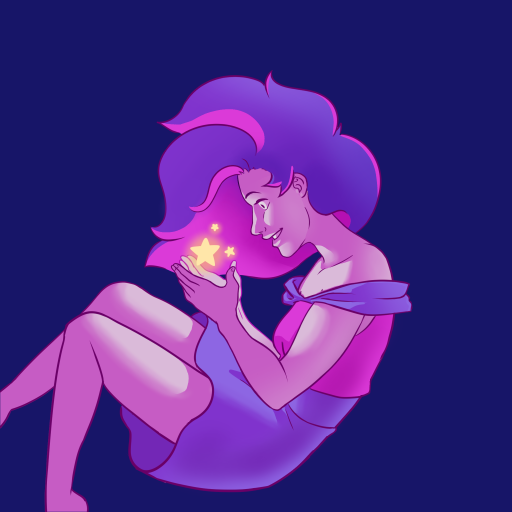
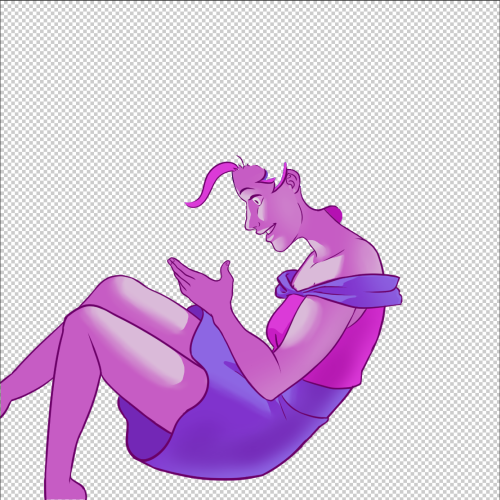
I ended up with a quick sketch of a character that will be floating in space and holding a floating set of glowing stars.
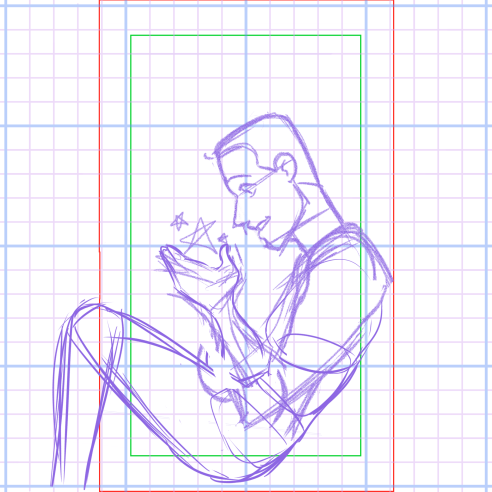
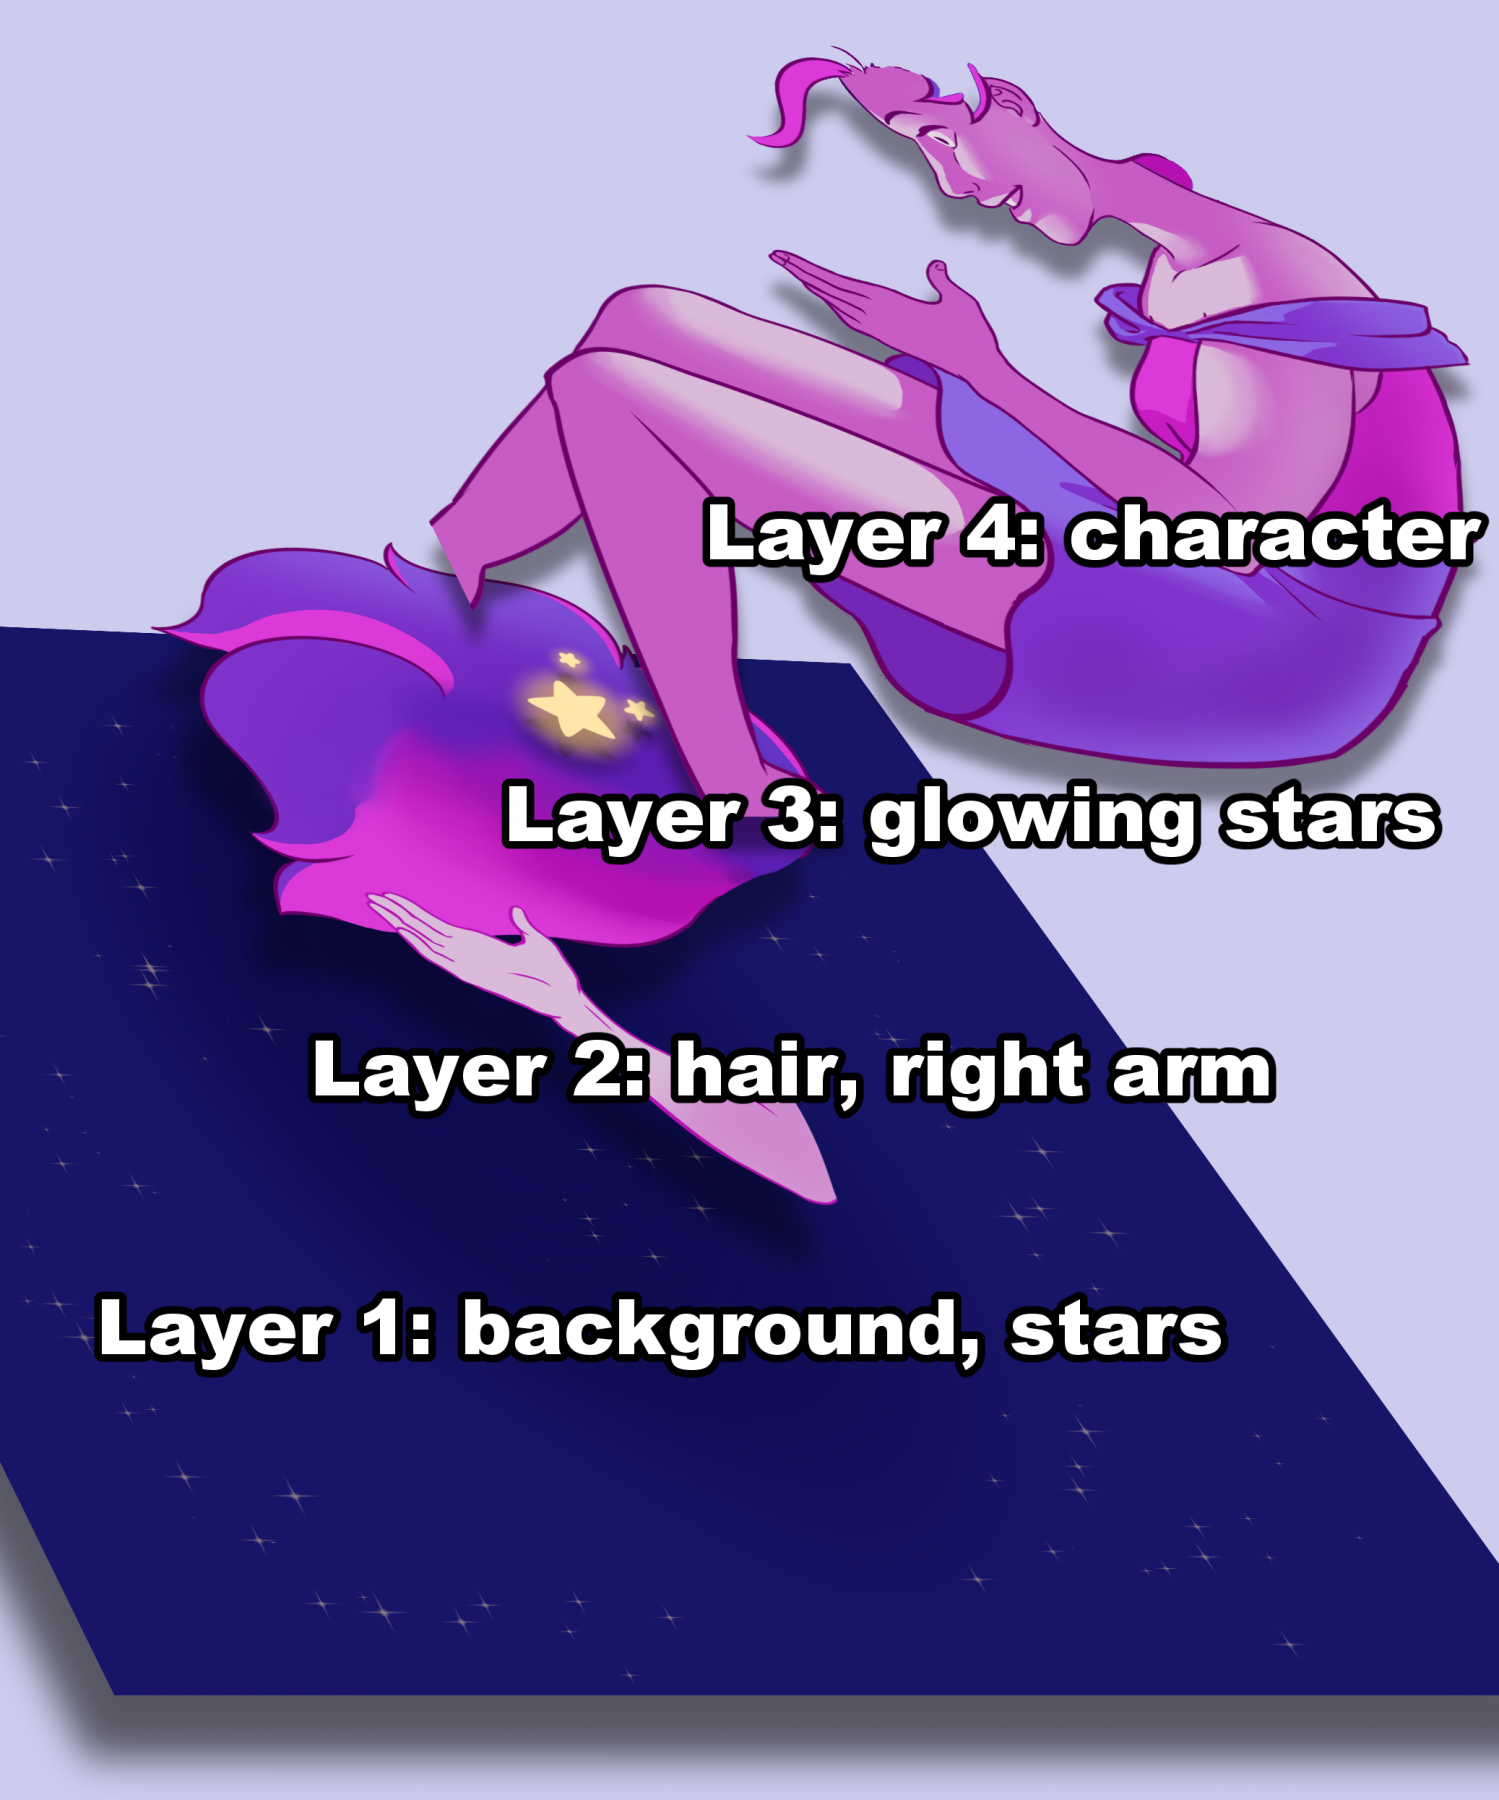
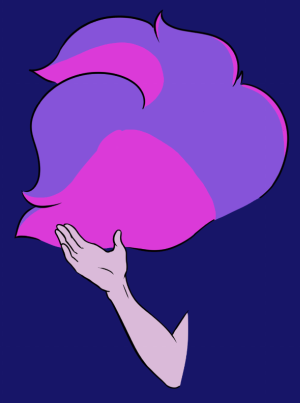
While I'm designing, I want to keep in mind how the layers will move to create a 3D illusion. I decided that the main character will be on the foreground layer, the glowing stars will be another layer, then the character's right arm and hair will be below that so it looks like the stars are in between the character's two hands. Finally, a background layer of stars will tie in the space fantasy visuals.
Drafting
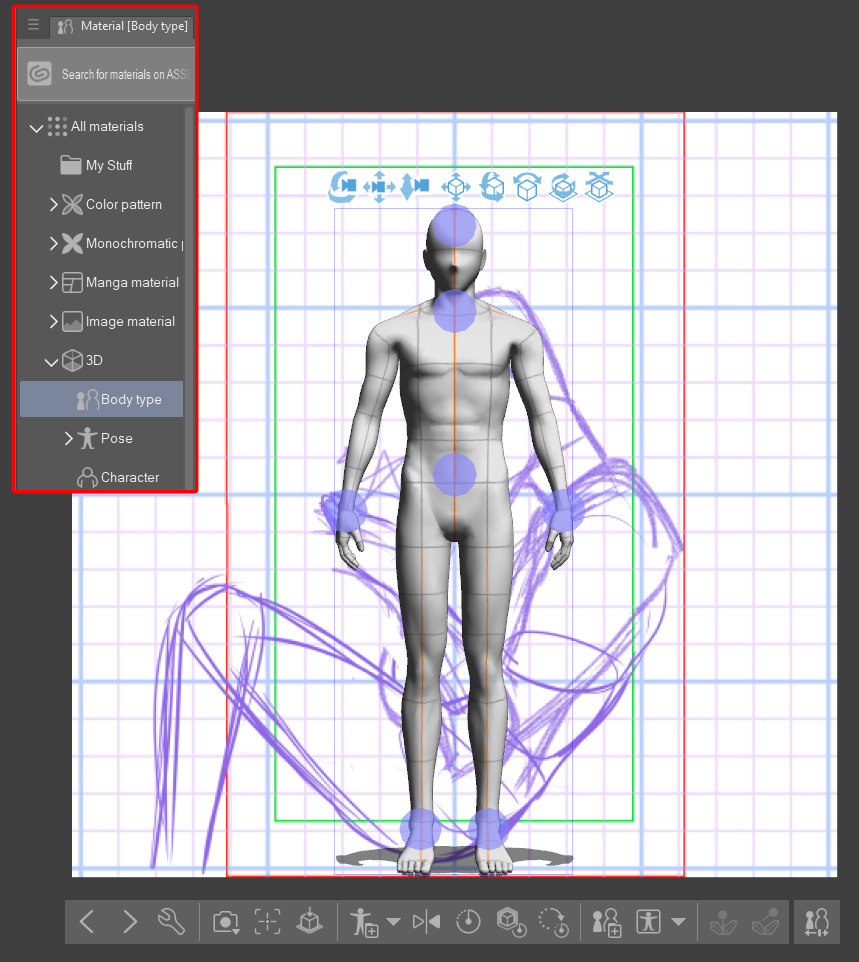
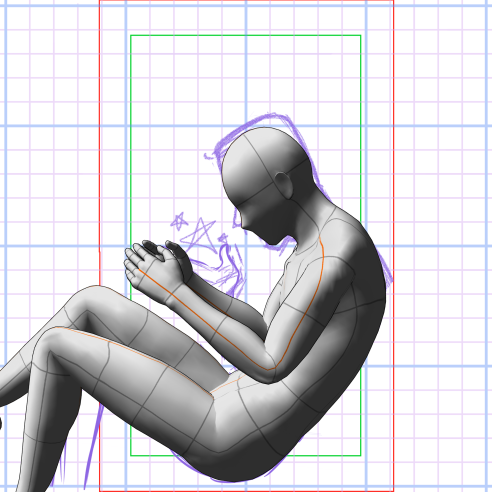
Now that the thumbnail sketch is complete, I can begin drafting. Clip Studio Paint EX has 3D tools which allows you to drag and drop posable 3D models from the "Materials" menu directly into your workspace that you can use for reference while you're drawing. I always like to sketch out my figures first and then use the 3D models to check my poses if I'm having trouble -- this gives me the best balance of fluid gestural drawing and accuracy.
Line art
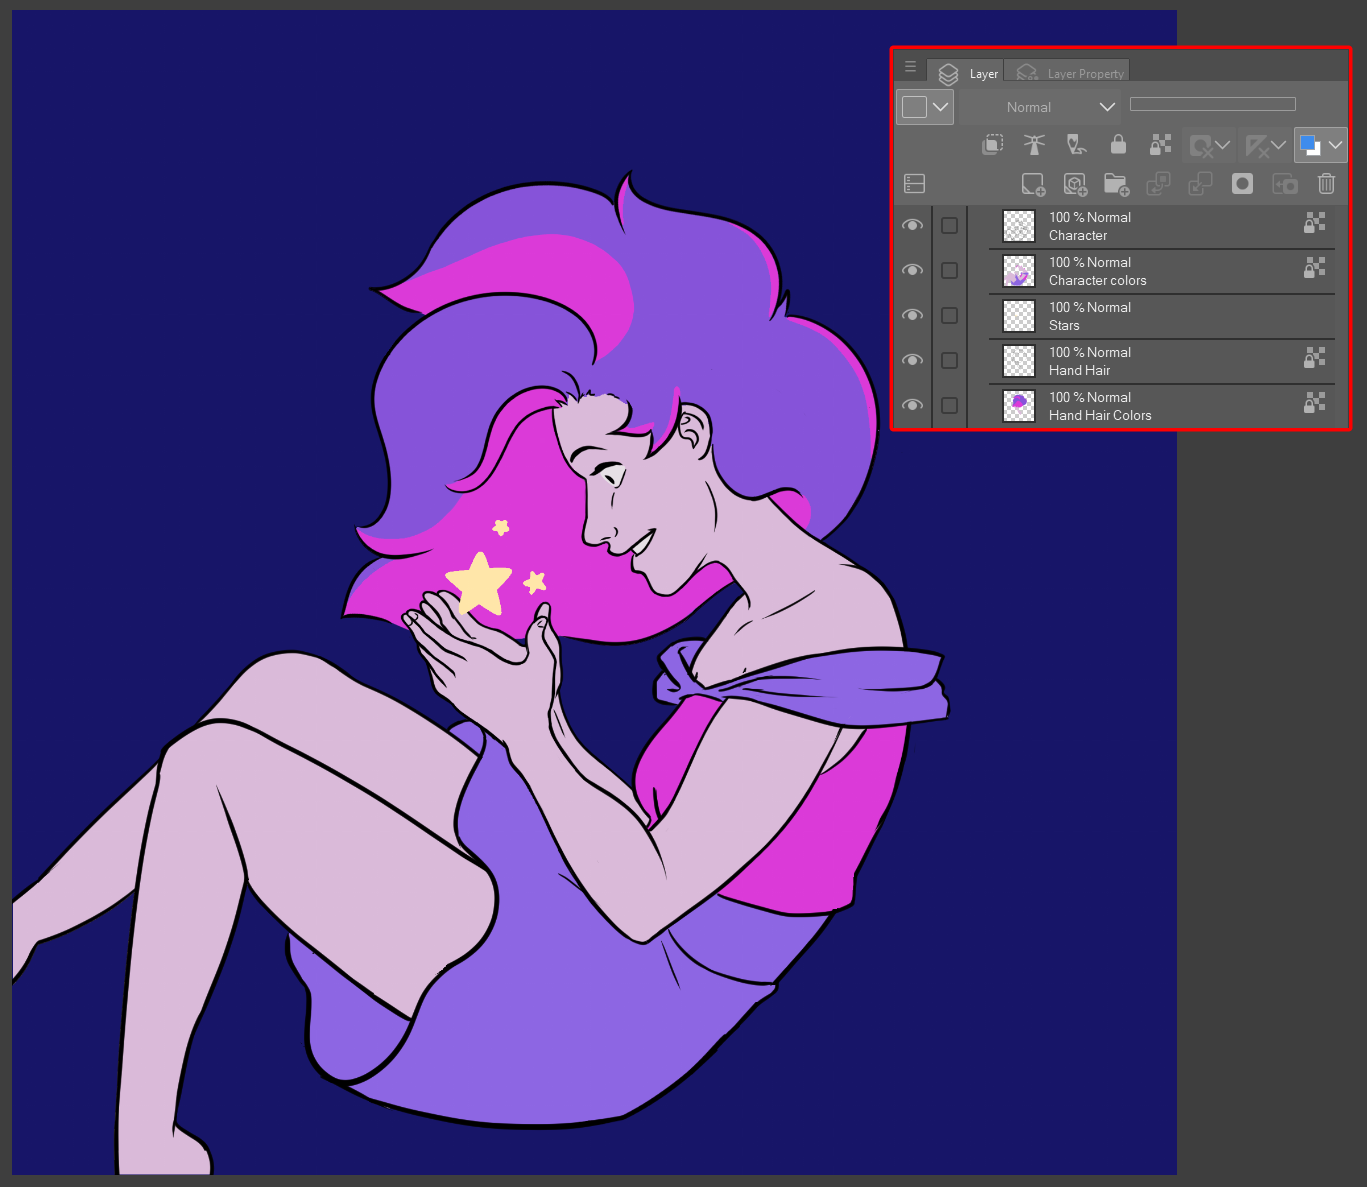
After checking my pose, I can get to work on the line art. Remembering that I need separate layers for the picture to parallax, I make sure to put the line art for the character and for their right hand and hair on separate layers.
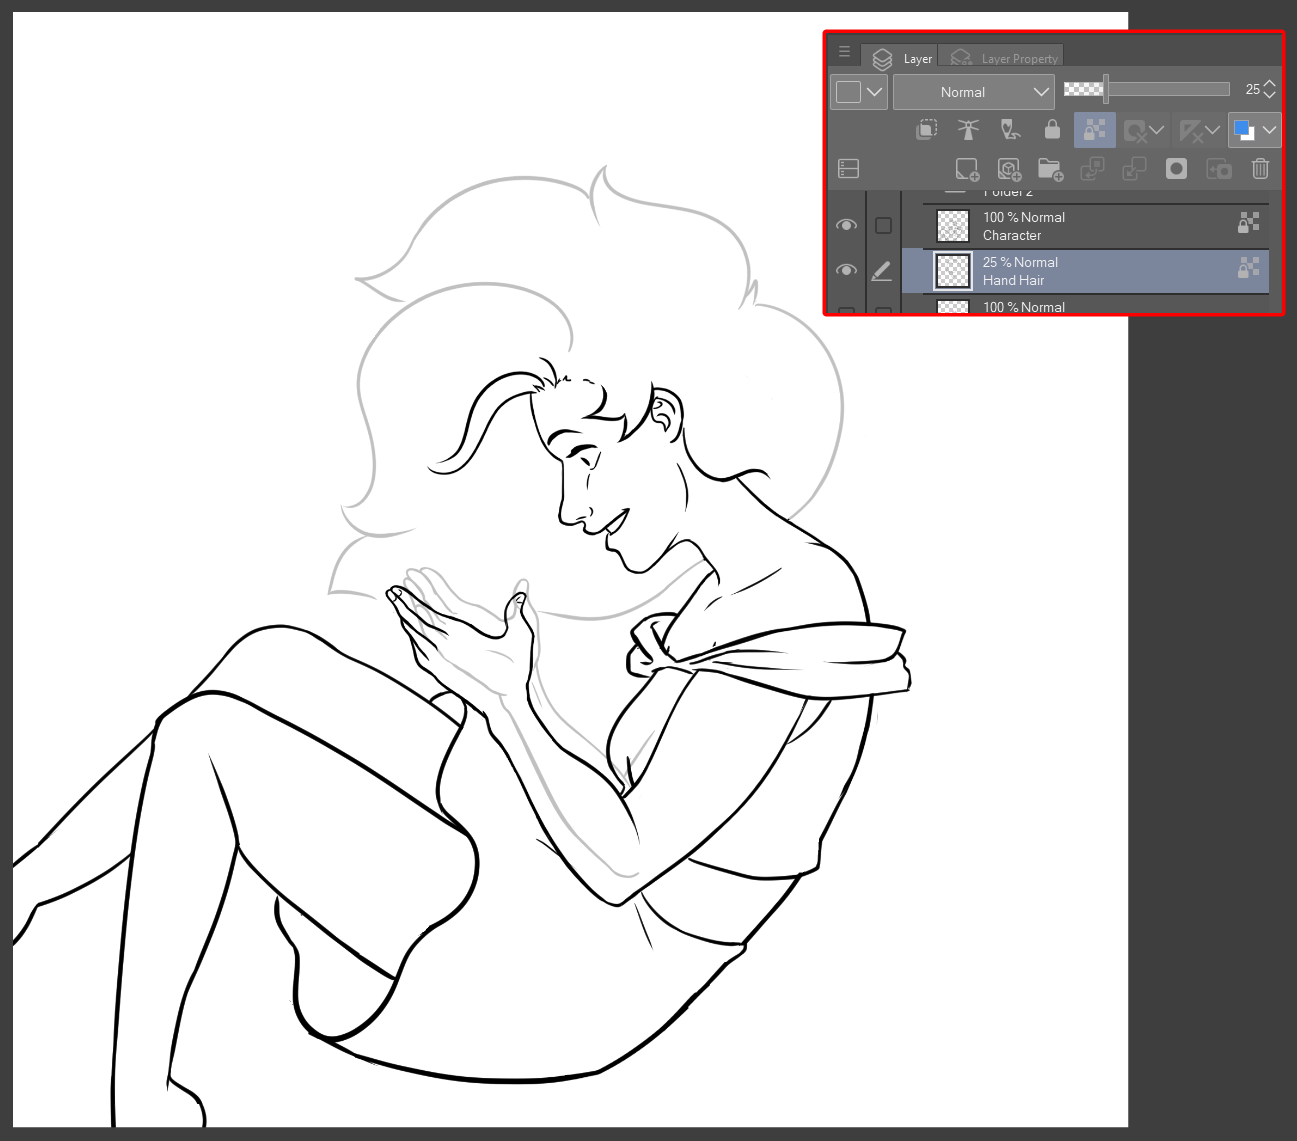
TIP: Keep in mind what pieces will move when drawing the line art of separate layers. You can see that even though the majority of the hair is on the lower layer, I do have her bangs and a wisp around the base of her neck on the foreground layer. This will let me move the bulk of the hair while leaving the shape of her head and face undisturbed. It will also help create depth in the hair and ensure it looks like it's still connected to her head.
Colors
The next step is to block in the colors. These will also be on separate layers for now, just for ease of drawing but we'll combine them with their line art layers for the finished product.
I use a combination of the magic wand (Auto Select), the Lasso Fill, and any hard round brush (I tend to use CSP's G-pen) to block in the entire shape of my foreground layer. In preparation for the next step, I lock the transparent pixels using the button at the top of the layers window (circled below). I'll do this for the Hand-Hair layer as well.
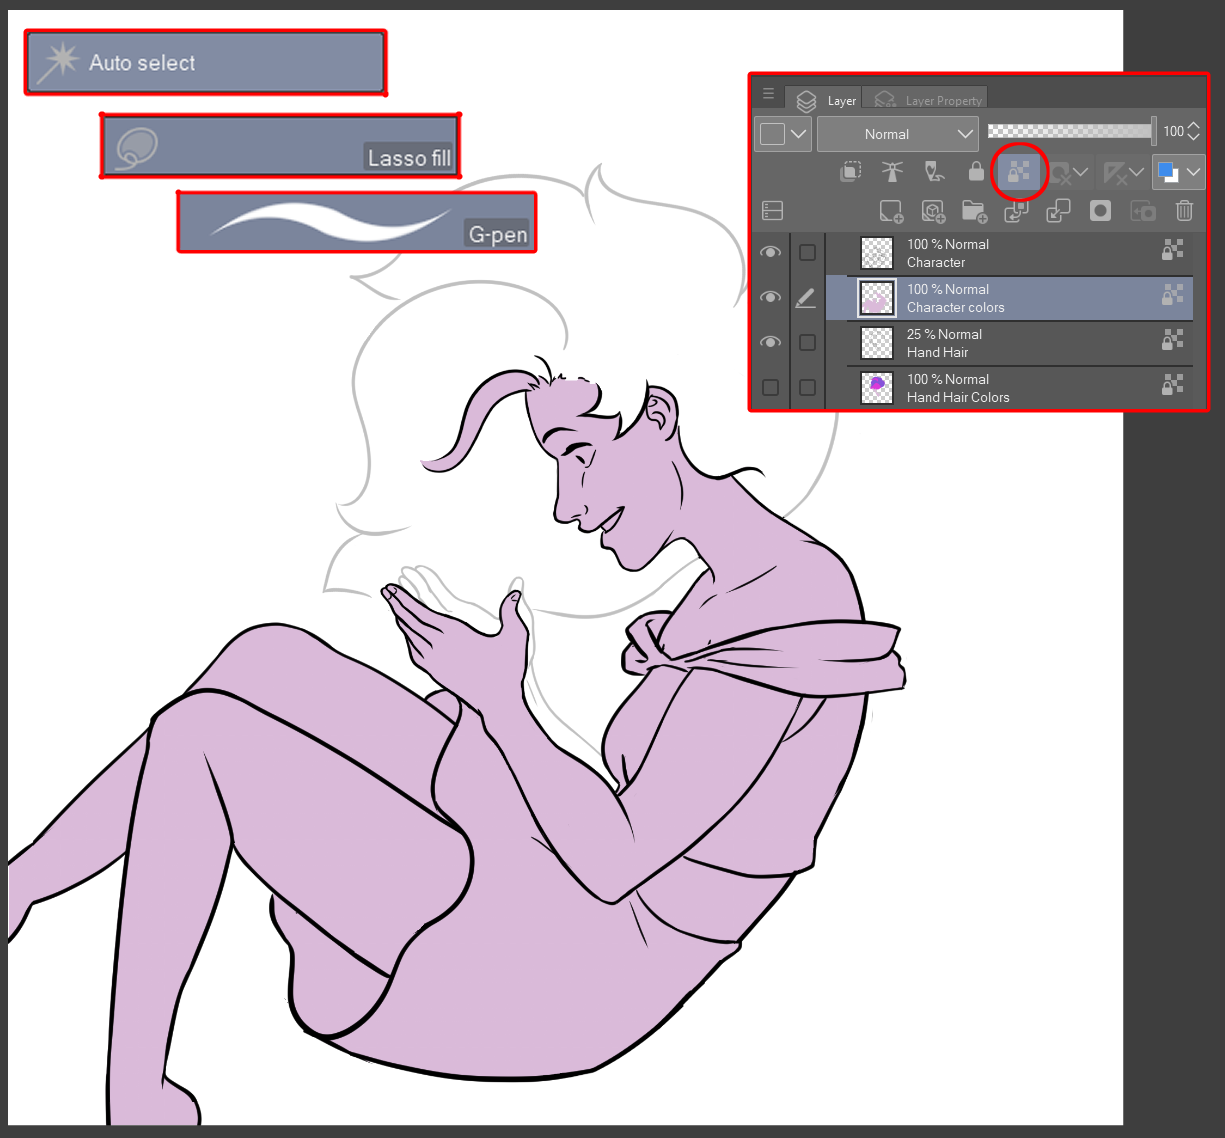
Using the same combination of tools (Auto select, Lasso Fill, and G-pen), I do the flat colors directly on all of the color block layers. Locking the transparent pixels before hand lets me fill the colors in especially quickly.
NOTE: This parallax background differs from a traditional illustration because the layers will be moving and you end up seeing parts of the layers that were hidden before. Because of this, you need to make sure to fill each layer with color or else you'll have holes in your final product.
Rendering
Now it's time to finalize this piece with some rendered lighting and finalized colors!
Blending modes in CSP allow for quick and easy shadows. Because I want this image to have pretty dramatic lighting, I'm going to create another layer and, using the same color block as before, fill my entire foreground shape with a pink color and set the layer mode to "Multiply." Then I'll use the Lasso Fill with a transparent color to cut out the places where the light is hitting my character. I'll use the Blend and Blur tools to soften the edges where the form turns away from the light source. Then I'll turn down the opacity on this shadow layer to something that I think looks nice.

I'll do that for the Hand Hair layer, too.
I'll also color the line art using the same transparent lock settings that I used for the color flats. That makes the line art more cohesive with the color scheme of the piece.
I'll add a glow on the stars using a soft round brush, and we're good to go!
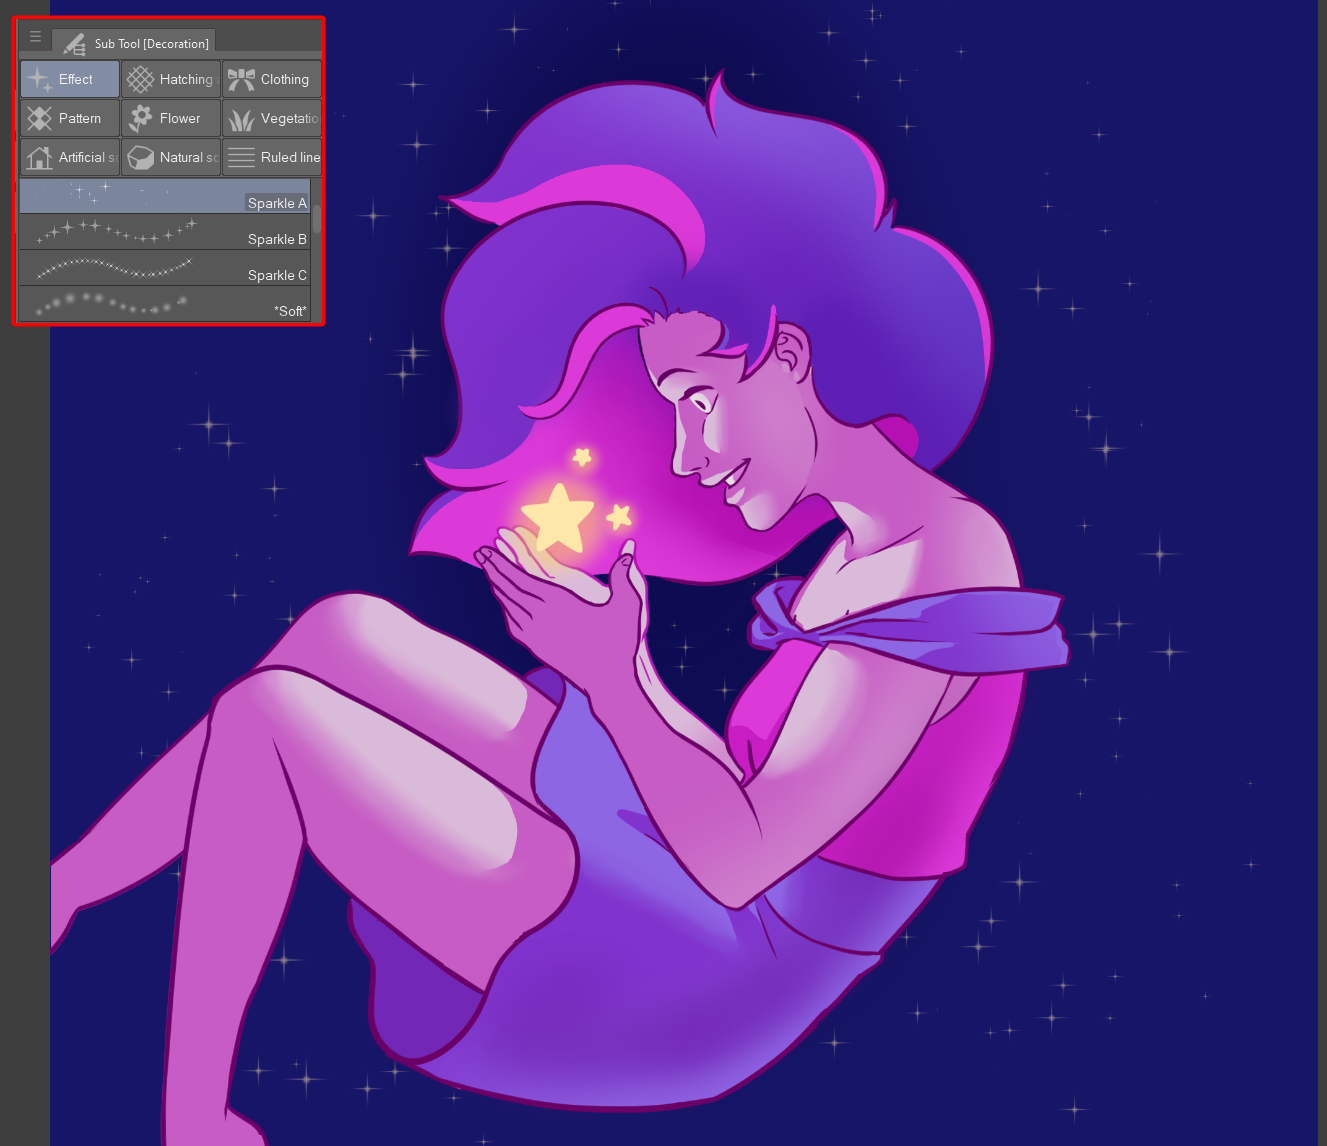
Background
For the starry background, we'll use one of Clip Studio Paint's excellent Decoration Brushes. A quick swirl of the pen and we have some beautiful stars to finalize our piece!
Setting It Up on Our Phone
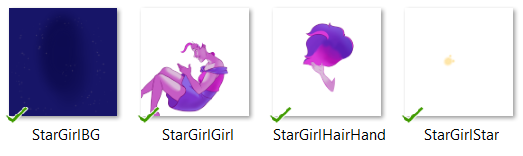
Saving the Layers
We need to save the layers individually so that they can be used in the app correctly. For each section, hide all other layers, so you only have that piece with a transparent background (indicated by the checkerboard design). Then save each piece separately. Save the files as PNG to preserve the transparency (otherwise the background will automatically be changed to solid white).
Download the files to you phone using email or a file syncing service.
Using the App
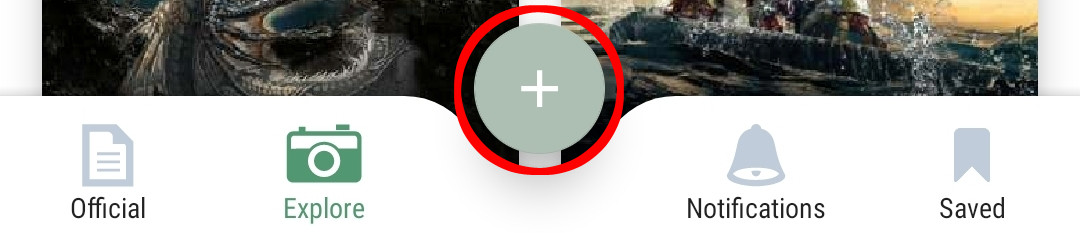
The final step is to use the app to line up the layers and set the background on your phone. Open the app and tap the "add" button to open the creation menu.
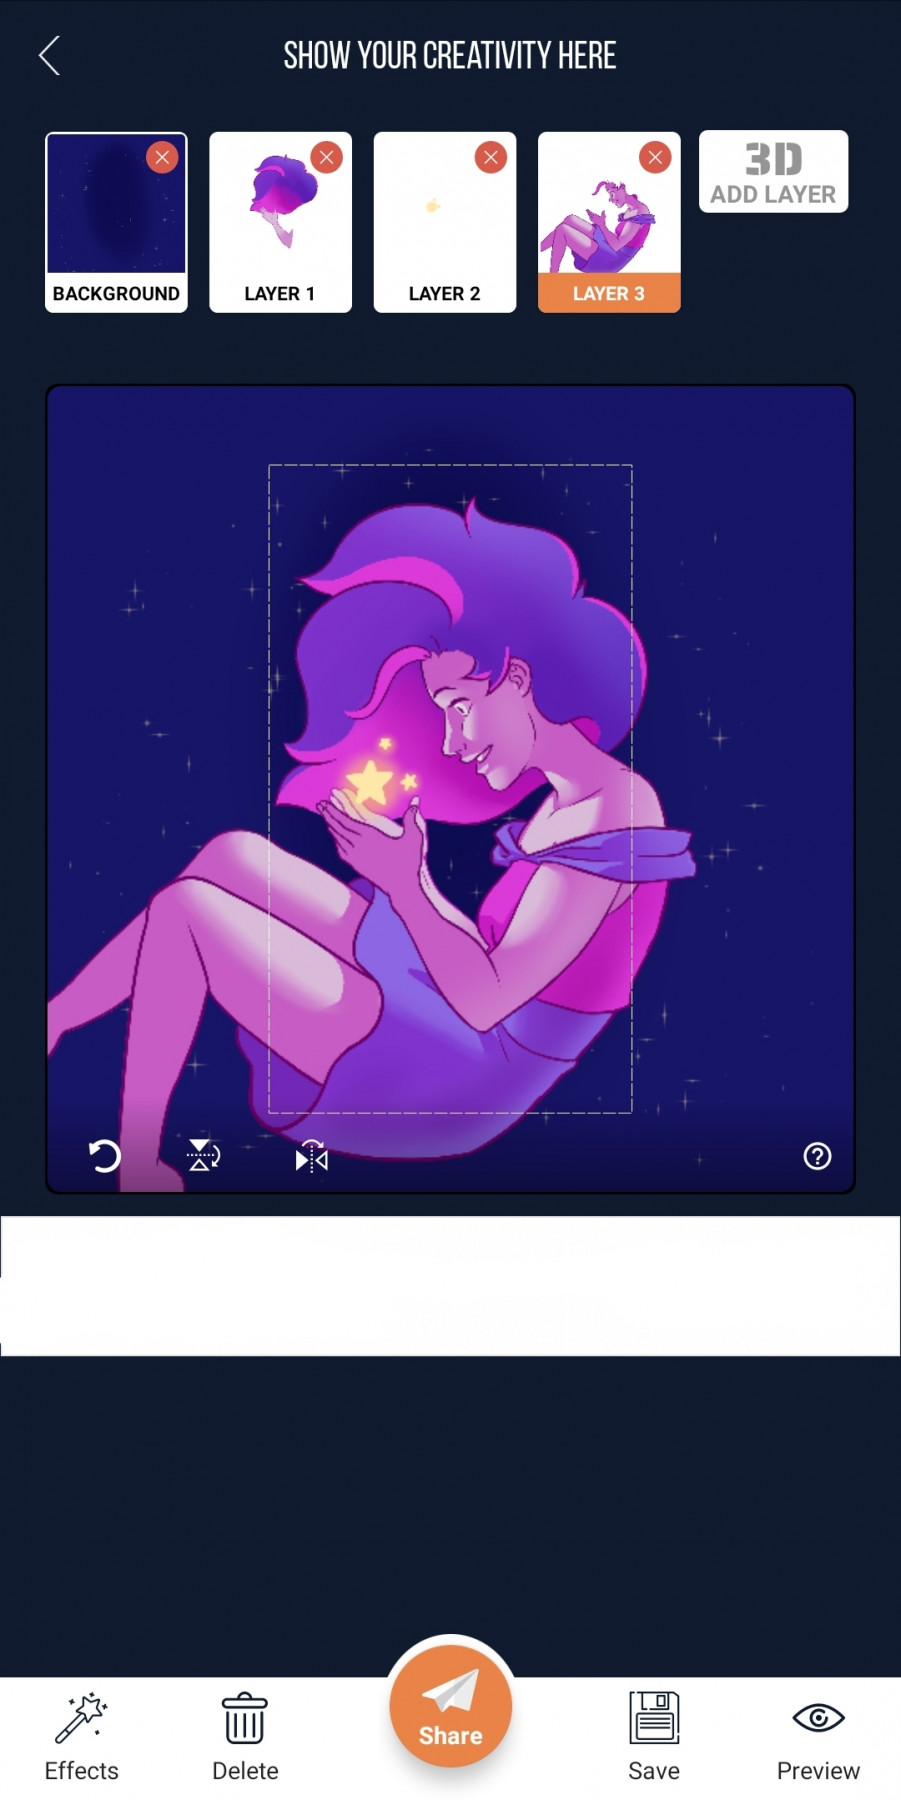
Import each of your files and arrange them as you need. You can even resize and reposition your layers if you need to, but be careful not to mess up your design! (Note that the free version of this app only allows for four layers. You'll have to pay for the app if you want to use more layers or some of their premium effects.)
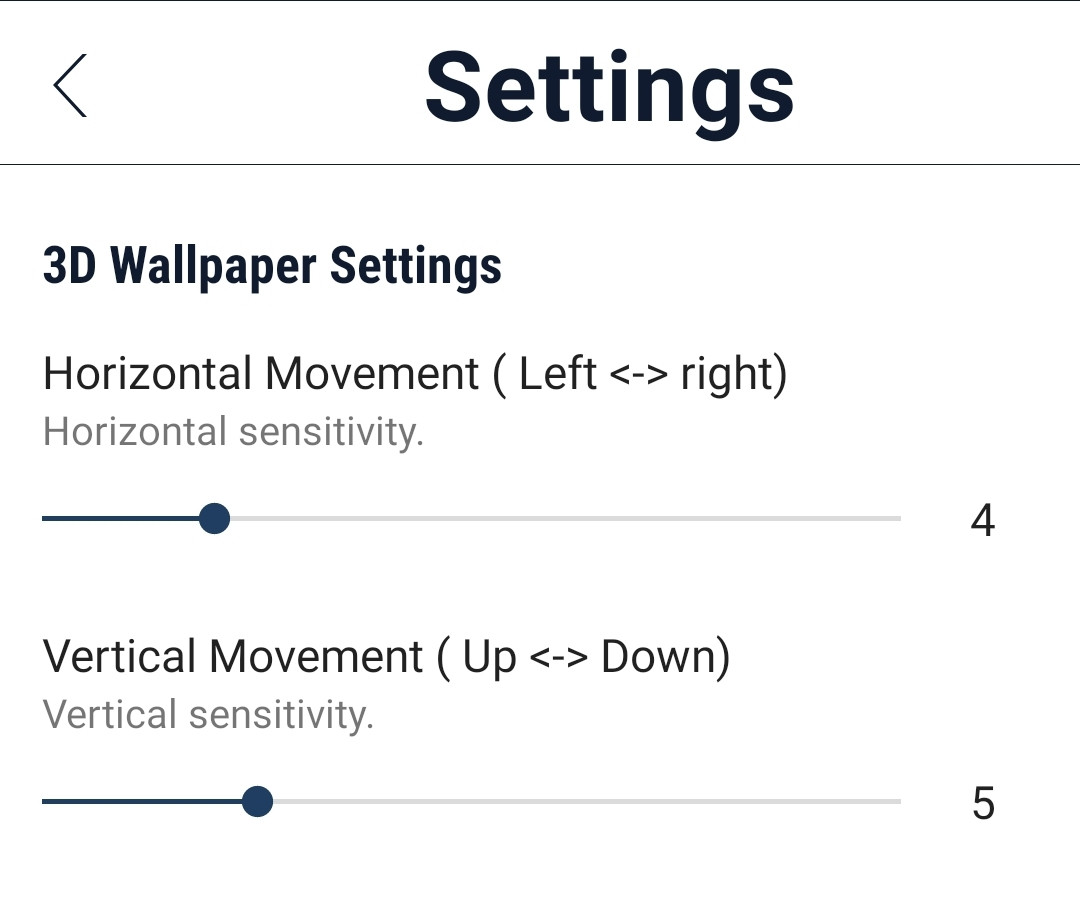
Finally you'll want to fiddle with the sensitivity settings to make sure your layers don't move to excessively for your design. Click the "Preview" button and "Settings."
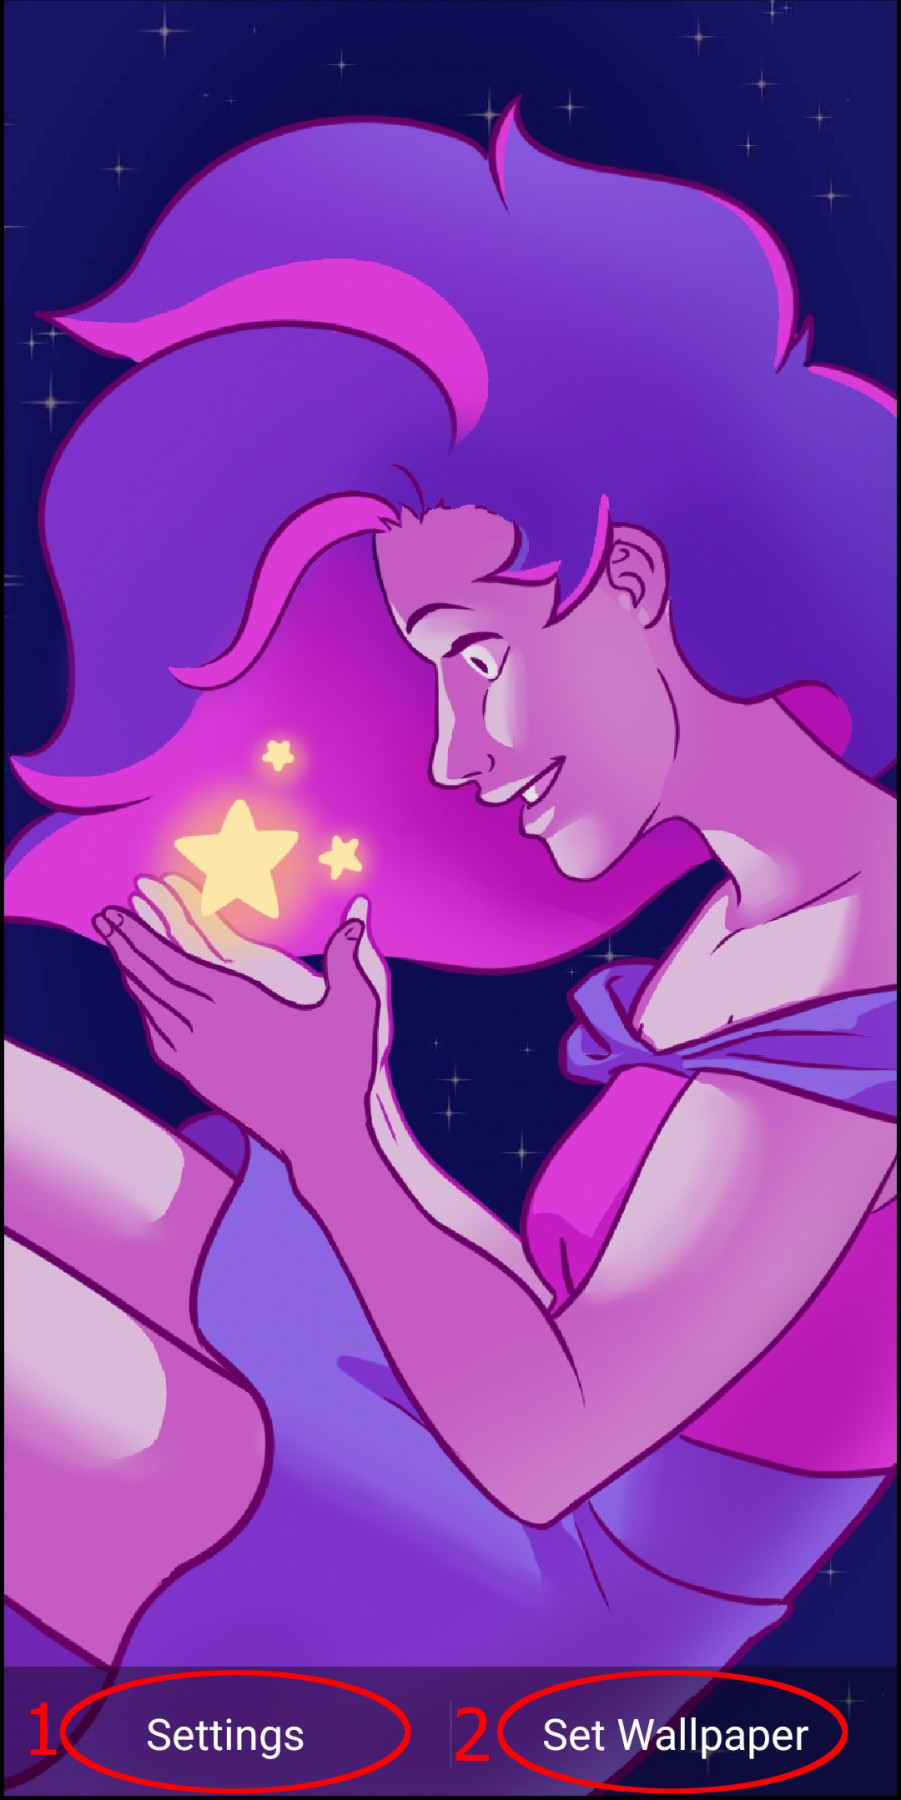
The last step is to tap "Set Wallpaper" and your design will appear on your home screen! And there you go! A unique illustrated background for your phone.
Final Notes
If I do this project with students, I'll simplify the drawing content from character art to something more entry level. For example, beginners can use Clip Studio's Decoration Brushes or other Downloadable Assets to create lots of really cool layers and we can use Gaussian Blur and Color Masking to create depth. I feel like there's a lot of potential for this as a short project.